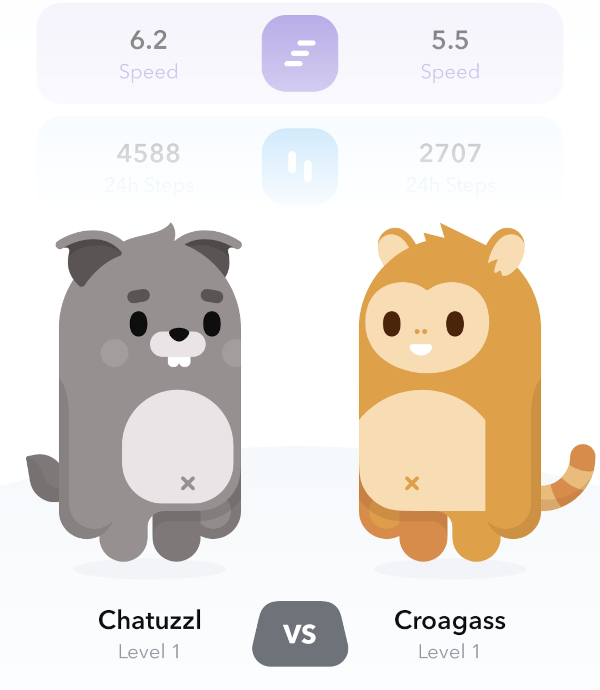
2021-11-18

Tonometer

The team which is developing the TON cryptocurrency offered everyone to make a network status page as a contest. I took part in this contest and got tons of fun.

Since the topic is very interesting to me, I thought, why not? At the very least, there will be motivation to figure out how it all works and what it consists of.

I did not have time to do everything planned, but more or less a working prototype turned out. Here you can check out the demo of the project.

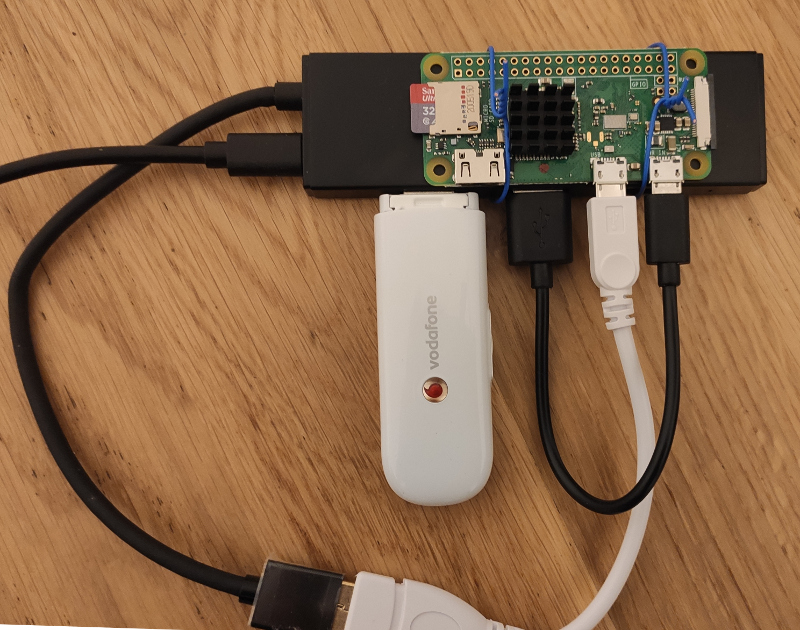
The data is collected on a home server where a lightweight client of the TON network is assembled, which requests data about the system and puts it in the InfluxDB database. The server part written in nodejs reads the prepared data and shows the data in the browser by the client to react.

The code is posted on github.


Оставить комментарий

 
  2021-10-31

Fixing TWS Bluetooth headset

The kids's TWS Bluetooth earbuds became poorly magnetized to the charging station, which is why they began to charge poorly. We bought new headphones instead, but I was wondering what happened to the old ones?

Disassembling the charging case gave nothing, visually everything was in place - there was a suspicion that something was wrong with the installation of the magnets in the charging case, but everything turned out to be in place. There was nothing to do but to assemble everything back. I tried to press the headphones themselves more tightly into the slot, gluing a piece of packaging bubble polyethylene to the opposite side of the case with double-sided tape, but I was not happy with such a "repair".

Then the idea came to my mind to check the location of the magnetic poles - possibly one of the magnets was glued in with the back side, and instead of attracting - pushed the earpiece away? I found a small magnet from other broken headphones and began to magnetize it to the case and to the plugs. In the case, everything was in place - both slots perfectly magnetized the test magnet, and on the same side. But the plugs showed an anomaly - being magnetized to one of the headphones, the magnet refused to stop in one place - instead, it strove to move to the side.

Disassembling the earphone immediately revealed that the magnet had peeled off from its rightful place where it should be glued and was magnetized to the magnet of the earphone.

In fact, in both headphones, the magnets turned out to be peeled off, only in one of them the magnet also slipped onto its side, which is why if one of the headphones was still at least charged, then the other was not charged at all. Apparently, this is the result of earplugs falling out in combination with poor quality glue.

I glued the magnet in place with cyanoacrylate and put the earphone back together - now it magnetizes and charges perfectly. Now my kid asks for the headphones back - the new ones turned out to be worse than the old ones!


Оставить комментарий

 
  2021-10-02

Quick setup Raspberry Pi Zero W

From time to time I have a need quickly setup Raspbian on Raspberry Pi Zero W.

Here is the quick step by step guide:

In the local computer download an image and upload it to sd card: (replace /dev/sdX, username, wlanname, wlanpassword, 192.168.0.155 with your own values)


# download image
wget https://downloads.raspberrypi.org/raspios_lite_armhf/images/raspios_lite_armhf-2021-05-28/2021-05-07-raspios-buster-armhf-lite.zip

# extract
unzup 2021-05-07-raspios-buster-armhf-lite.zip

# copy to device
sudo dd if=2021-05-07-raspios-buster-armhf-lite.img of=/dev/sdX bs=2M conv=fsync

# activate ssh
touch /media/username/boot/ssh

# update the wifi access credentials
cat > /media/username/rootfs/etc/wpa_supplicant/wpa_supplicant.conf << EOF
ctrl_interface=DIR=/var/run/wpa_supplicant GROUP=netdev
update_config=1
country=DE
network={
        ssid="wlanname"
        psk="wlanpassword"
        key_mgmt=WPA-PSK
}
EOF

# setup static IP address
cat >> /media/username/rootfs/etc/dhcpcd.conf << EOF
interface wlan0
static ip_address=192.168.0.155/24
static routers=192.168.0.1
static domain_name_servers=192.168.0.1 8.8.8.8
EOF

# prevent warning locale not found
cat >> /media/username/rootfs/etc/environment << EOF
LC_ALL=C
LANG=en
LANGUAGE=en
EOF

Put sd card to device and turn it on.

If everzthing went successful then you will see the new device in the network.

Connect to device by ssh: pi@192.168.0.155, the default password: "raspberry".

    
# expand filesystem on SD card
sudo raspi-config --expand-rootfs

# reboot
sudo reboot now

# after reboot login again and
# upgrade the system
sudo apt-get update
sudo apt-get upgrade -y        
    

After all steps above you will have a device with Linux to play with.

It is very important to use good card reader. I wasted lots of time before I discovered that my internal card reader does not write sd card well. It reads ok, but when I try to write or format sd cards on it the previously written information appears unchanged. After swithing to exteranal card reader all problems were gone.

The more information you can find on the original Raspberry Pi OS documentation.


Оставить комментарий

 
  2021-06-09

Transferring email messages between imap mailboxes

howto, tools

After moving to a new server, the question arose of how to transfer email message from the old server to the new one. I could not say that there was a lot of useful information, but just in case it never hurts to have copies of archival documents from the past.

So I began to research how to do it. Moving the email folder with mail on the server disk turned out to be not the best option - it did not want to copy all the files, but it was not possible to copy the folders.

I did not find a single useful linux utility, but I came across several paid ones that did not inspire confidence.

As a result, the problem was solved in the most banal way - since both servers were still functioning for me - I simply selected the folders in Thunderbird that needed to be transferred to the new server and dragged them to the new account! It's that simple!

Everything went well! This was the last step I needed to complete the move process, now the old server can be safely paid off without paying twice as much for hosting!

By the way, I highly recommend linode - I have been using this hosting provider for many years and I like everything with them! For five dollars a month, you will get a full-fledged virtual dedicated server for your projects, with 1 GB of RAM and 32 GB of disk space, it is enough for a small pet project.


Оставить комментарий

 
  2021-06-05

Setup of the new server

Found a useful article on how to set up your own mail server. This is important to me - without such hints, setting up the server takes about twenty-four hours and with the instructions this can be completed in just a day. If not for some minor mistakes in the article, it could have been done even faster. After some time, the antivirus that I have installed according this article was uninstalled - this thing eats away almost a quarter of the RAM, which is slightly critical to me.

On the same site you can find of how to configure Apache, PHP and MySQL. I can not say that this information is very necessary - you can install them without such instruction, but with instruction it is easier.

The OpenVPN can be configured here according to this instruction. In my opinion, OpenVPN should be configured by every self-respecting specialist.

What useful links and instructions do you have?


Оставить комментарий

 
  2021-04-13

New device to play with Asterisk

I have created a new device for experimenting with Asterisk. For some reason, the firmware made by the author of raspberry-asterisk hangs at random times. Sometimes it works for several days, sometimes it freezes after a few minutes. At first, I sinned on the raspberry itself, then on the SD card, then on the power supply. However, the device freezes stably.

Yes, I know that it is impossible to assemble a stable working device with an asterisk on a ten dollar board that will fully fulfill the functions of an "adult" ATC. I know that for something more serious you need more serious equipment. But I still want to know how to do it!

Having adjusted the memory and temperature monitor of the device, I noticed that the device does not consume a lot of memory and does not go into CPU throttling, but, nevertheless, the processor temperature is slightly higher than on a similar device without an asterisk.

I decided that it was all about the firmware itself, because even the author of rasbnerry-asterisk no longer supports Raspberry Pi Zero in new images.

Therefore, I decided to install Asterisk on Debian from scratch, fortunately, the are already many instructions in the net how to do it. In order to do it I ordered a new board and a USB hub. The board was powered from the same hub which is goos - not all devices allow that but this one worked as expected. The USB stick was also successfully discovered by the device as well.

Compilation of the asterisk took several hours, but everything worked as it should and in the end I got a completely working system.

So far the device works stably - let's see how long it will work in this incarnation.

P.S. Works stable not reboots, no freezing, so the problem was in original firmware. Looks very promising.


Оставить комментарий

 
  2021-01-20

Dummy Credit Card Numbers

Sometimes when when you develop, for example, an online shop you need the credit card number that passes the credit card validation test.

There are many sites that could give you a bunch of random cards e.g. this one.

But much simpler to remember couple of them so you do not need to copy paste anything fromt third party resources.

There are two numbers that can be used in this situations which can be easily remembered:

4111 1111 1111 1111

and 

4242 4242 4242 4242 

I did know about the first one but I did not know about the second one which is also quite easy to remember.


Оставить комментарий

 
  2021-01-09

Eye tracking with mobile phone

Such an incredible idea of using a smartphone with front camera as an eye tracking device. I love this approach!


Оставить комментарий

 
  2020-12-18

How to build custom Alexa Skill

Tried out creating custom Alexa Skill. There is a great tutorial for doing that.

Good thing that it works immediately on my mobile device so it is not required to publish it if you build something for fun!

One thing did not work well for me - I can not access and delete stored information in the S3 Bucket that is used to store my birthday, therefore I can not run an application more than once. Lets see if the issue will be fixed or I have to ask support to help me out.

The voice assistans with time will be very popular - such devices are very cheap now but I would use them with caution - there are still many problems and skills are very basic yet.


Оставить комментарий

 
  2020-11-14

How to install Git on Android phone

Questioned myself, is it possible to create git repository on android phone, edit project files on android phone and then push these to remote repository? Appeared that it is possible and works really well!

In order to do that I have installed Termux, Termux:Api, Termux:Widget. It is important to install all three apps from one market - they exist in F-Droid и Android Play Market but the last one in Android Play costs $2 but in F-Droid - it is free.

Run Termux and install all necessary packages, allow access to file system:


pkg install git openssh termux-api
termux-setup-storage

Create project folder:


mkdir /storage/emulated/0/Documents/work
cd /storage/emulated/0/Documents/work
git init
git remote add origin git@github.com:username/reponame.git
git config --global user.email "your@email.com"
git config --global user.name "Max"
nano readme.md
git add readme.md
git commit -am"first commit"
#create keys pair:
ssh-keygen
cat /data/data/com.termux/files/home/.ssh/id_rsa.pub
#copy the public key into the remote folder.

Creating folder with startup scripts:


mkdir -p $HOME/.shortcuts
mkdir -p /data/data/com.termux/files/home/.shortcuts/tasks
cd /data/data/com.termux/files/home/.shortcuts/
nano ./push.sh 
chmod +x push.sh

push.sh looks like this:


#!/data/data/com.termux/files/usr/bin/bash
cd /storage/emulated/0/Documents/work
git add *
git commit -am"autocommit"
git push origin master
termux-toast "Changes successfully pushed" 

Create pull.sh:


#!/data/data/com.termux/files/usr/bin/bash
cd /storage/emulated/0/Documents/work
git pull origin master
termux-toast "Changes successfully pulled"

Add the widget on our screen and use it to trigger pull и push scripts from there!

Now I can push and pull changes from my phone screen!


Оставить комментарий